Your First Lambda with Rust
Getting Started
Congratulations! You've decided to build your first Lambda with Rust. If you've never built a Lambda before, head over here first and then come back. This content will still be here.
Creating a Project
So many options to choose from, but for this first Lambda, we are going to use Cargo Lambda

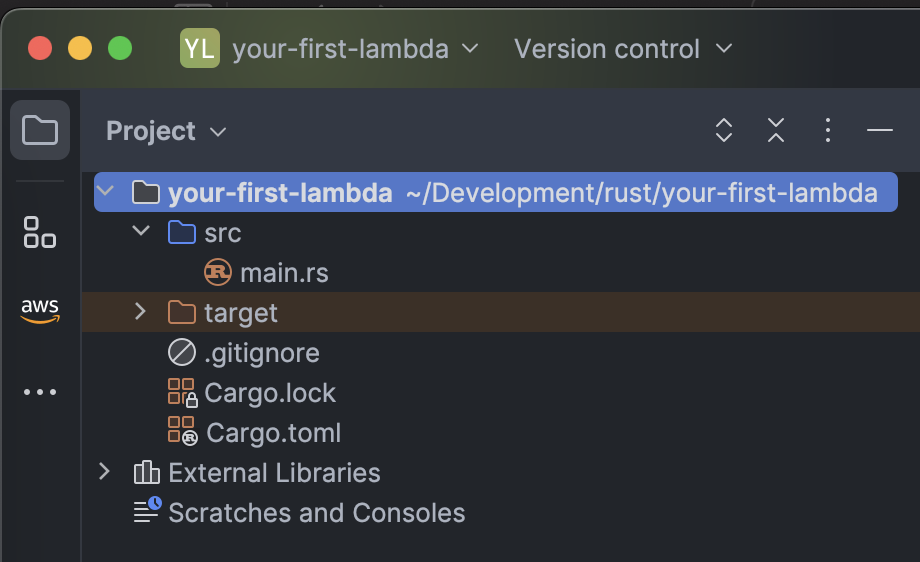
After running cargo lambda new your-first-project, you'll see that Cargo Lambda creates the following project structure.
Exploring the Files
Cargo.toml File
If this is your first experience with Rust, you might not be familiar with the Cargo.toml file and what's its purpose is. Luckily, there's a page dedicated to that. Head on over there first and then come back here. And if you want some more detail on TOML or Tom's Obvious Minimal Lanuage, this link has you covered.
[package]name = "your-first-lambda"version = "0.1.0"edition = "2021"authors = ["Your Name Here"][dependencies]lambda_http = "0.10.0"tokio = { version = "1", features = ["macros"] }
A Rust Cargo.toml file allows you to define a great number of details about the way your crate or binary is represented in addition to the dependencies required.
In the [package] section, you can define things like:
- Name
- Version
- Authors
- License.
The [dependencies] section is where the crates your function needs are defined. A Rust dependency may look a little different than what you are used to.
For instance, the lambda_http dependency just includes a version after the = sign. However, the tokio dependency is declaring a version and the features it wants to utilize. Feature enablement in the dependencies section allows you to only include what you need. This will further reduce binary size and build time.
Single source file
Main Function
Rust is like a lot of languages that require a main function as the entry point into your application. A Rust Lambda looks just like a normal Rust console program.
One thing to note is the tokio macro macro. Macros in Rust are signals to the compiler to generate some code based upon the macros' definition.
The tokio macro allows the main function to run asynchronous, which is what the Lambda handler function requires.
#[tokio::main]async fn main() -> Result<(), Error> { tracing::init_default_subscriber(); run(service_fn(function_handler)).await}
The run and service_fn are a part of the lambda_http crate that we saw in the Cargo.toml file. The run function handles polling of the Lambda Runtime APIs.
Handler Function
Let's take a look through this handler that was created when running cargo new.
async fn function_handler(event: Request) -> Result<Response<Body>, Error> {// Extract some useful information from the request let who = event .query_string_parameters_ref() .and_then(|params| params.first("name")) .unwrap_or("world"); let message = format!("Hello {who}, this is an AWS Lambda HTTP request"); // Return something that implements IntoResponse. // It will be serialized to the right response event automatically by the runtime let resp = Response::builder() .status(200) .header("content-type", "application/json") .body(message.into()) .map_err(Box::new)?; Ok(resp)}
The first part of this handler is extracting name from the query string parameters. If the there are no parameters, then when the parameter is unwrapped, if empty it will return "world".
The second half of the function is to build the Response object, set the status to 200, and then set the content type to application/json.
One thing that might look a touch odd if you are new to Rust is this Ok(resp). Rust makes use of a Enums quite a bit. Enums in Rust are a bit different than other languages. For now, just know that the Result enum can either be a value or an Error. Ok() returns the value portion of the Result enum. In this case, the response.
Running the Lambda Locally
Cargo Lambda does more than generate a project structure. It also provides a local testing engine. In order to test your new Lambda function first do the following.
In a separate terminal window run the following command in the project directory.
cargo lambda watch
What you'll see is your Lambda code will first be compiled and then Cargo Lambda will be "watching" for changes. What's nice about this approach is that it's quick and responsive so that as you change code in your handler, it'll be ready to execute.
Now in the opposite terminal, you need to send a test event to your Lambda in order to exercise the functionality.
cargo lambda invoke --data-example apigw-request
Running invoke with --data-example will pull example requests from the Cargo Lambda GitHub repository. For this first Lambda, a sample request is just fine.
The output for running the above will look like the below.
{ "statusCode": 200, "headers": { "content-type": "application/json" }, "multiValueHeaders": { "content-type": [ "application/json" ] }, "body": "Hello me, this is an AWS Lambda HTTP request", "isBase64Encoded": false}
Congrats!
You have now built and tested your first Lambda and Rust function!